Sunday, April 25, 2010

Tri-Tip on the Grill

Well the rain and cold have given way to a beautiful weekend here in SoCal, so it's ime to bust out the Weber grill.  This recipe for Santa Maria tri-tip appeared in the LA Times a few years back and it's a keeper:

6 cloves of garlic, chopped
1/4 cup of olive oil
4 teaspoons of sea salt
1/2 teaspoon whole black peppercorns
1  (3 pound) tri-tip roast with a thin fat layer

Start by grinding the garlic, oil, salt and peppercorns in a blender to a coarse paste.  Trim the roast of excess fat but leave a nice layer that you can score with a knife.  Pat dry the meat and place in a sealable plastic bag.  Add the garlic paste and seal the bag, pressing out the air.  Massage the meat until evenly coated and then place in the refrigerator for at least an hour.  Soak some chunks of oak (or whatever smoking wood you prefer except mesquite) in water.

After the coals in the chimney starter begin to ash over, pile them on one side of the grill and add the soaked wood chunks.  Place the meat fat side down directly over the coals for a few minutes.  Don't worry about a little char, it's necessary for a good crust.  Turn the meat over and sear the lean side for the same amount of time. Check out the flames in this pic.


Since we're grilling indirectly, we now move the meat to the cool side of the grill, insert the meat thermometer probe and cover.  Open the vents on your lid about halfway.  Now we wait.  Sittin' in a lounge chair, drinking a cold beer and watching the smoke puff out the top - 'nuff said.  Don't peek - remember, if you're lookin' you ain't cookin'.


Trust in your meat thermometer, it pays to get a good one.  If you like it on the rare side of medium, wait until the temp reads 128 degrees and then move it to a platter.  Set the roast aside for about 10 minutes to finish cooking and to allow the juices to settle.  Carve thin slices against the grain.


That's Sunday at my house.

Wednesday, April 21, 2010

39 Degrees


What the hell?  That's no sofa in the garden.  Thanks to El Nino, it was a brisk 39 degrees  and raining in the SCV when I left the house this morning.  Not good.  Luckily, I bought  a floating row cover  a couple of months ago during my last trip to Green Thumb and have put it to good use.  Temperatures are expected below 39 tonight as winter won't go down without a fight.   My apologies to the East Coast contingent where they have real winters, but the Live Mega Doppler 7000  says we're on Stormwatch!

Tuesday, April 20, 2010

Diggin' in the dirt

I got all of the tomatoes in the ground yesterday. All eleven of them.   I know how I went on about ten being the magic number on the last post, but the Amish Paste plant looked too good to leave out of the mix.    So, as Nigel from Spinal Tap said while showing off  the guitar with the special volume knob: "This one goes to eleven.  It's one louder."

One quick tip: plant the tomato plants DEEP.  Remove the lowest set of leaves and plant them with the remaining leaves close to the ground.  Roots will develop all along the stem resulting in a stronger plant.  I added some organic granular fertilizer in each hole to get them off to a good start.  We won't add any additional fertilizer until the fruit forms.

Sunday, April 18, 2010

The Starting Lineup

And then there were ten.   Perhaps my least favorite of the spring planting tasks, the day has finally arrived when I must choose which of the tomato plants will have made it on the varsity team, and which will be gifted to a few lucky family members and friends.   Tomato plants need lots of space, and due to my small backyard allotment, this year I am going to reduce the number of plants to ten, instead of the traditional sixteen.  Let's see if there is a marked improvement in the total yield department.  I've been guilty in the past of cramming too many plants together in such a small space, the resultant "hedgerow" was an impressive sight no doubt, but definitely had a negative impact on the overall performance of the crop.  The plants need space for air circulation and ample sunlight.

So here they are:   (2) Zapotec Pink Ribbed
                              (1) LaRoma II  hybrid
                              (1) SunSugar FT Hybrid
                              (1) Paul Robeson
                              (1) Early Wonder
                              (2) Rutgers VFA
                              (2) Virginia Sweets


Which of the plants will grow up to be doctors or lawyers and which will end up strung-out felons?  Who's to say and only time will tell.  Hope springs eternal, but I am ever mindful of the fact that no matter what I do, or how hard I try, Mother Nature always bats last.

Tuesday, April 13, 2010

Winter weather?

How bout this past weekend's storm which dumped a whole lot of rain and high winds Sunday night.  With the overnight temperatures getting down to the low 40's, I felt a sense of relief that I successfully fought the urge to get the plants in the ground last week.

Tomatoes and peppers need the soil temperature to be at least in the 60's, with the average overnight temps to be in the mid 50's.  If the soil is not warm enough, the plants will languish making themselves vulnerable to all sorts of pests and disease.

If you don't have a soil thermometer, here's a great way to tell if your soil is ready, no joke:  Sit your bare ass (not to be confused with the bear-ass, that would qualify as a registrable offense) in the dirt and if you can remain comfortable for 60 seconds, your plants are ready to go in.  For me, I'll just wait until the last week of April. For those brave souls who prefer to live on the edge, try to be discreet.  And if the neighbors happen to catch a glimpse, just tell 'em you got a little behind in the garden.

Saturday, April 10, 2010

Fertilizers

As many of you already know, I prefer to grow the garden completely organic. It's not that I'm trying to save the world or provide safe haven for the endangered Peruvian Puff-Peppered Stickleback Garden Grouper, I just figure we get enough chemicals and other nasties walking to the mailbox, why put them in your homegrown veggies?

I won't go on a long dissertation extolling the benefits of using organic fertilizers and pesticides over the likes of Miracle-Grow and Bug-B-Ded, it's just better, for all of us. The local stores have plenty of organic fertilizers to choose from such as Whitney Farms, Dr. Earth and FoxFarm's Peace of Mind. On a side note, 5 out of 6 ganja growers prefer FoxFarm, or so I've been told by the 18 yr-old Frank Zappa clone at one of the local nurseries.

What do those three numbers on the bag or box mean? You've seen 'em : 29-3-3, 16-16-16, 5-1-1, and so on. Fret not for I will explain. They stand for the percentage by weight that the product contains of the 3 macronutrients in order: nitrogen (N), phosphorus (P) and potassium (K). Plants need nitrogen for green leafy growth, phosphorus for strong root growth, flowering and fruit, and potassium to promote vigor and disease resistance.

Ever notice that your lawn fertilizer usually has a high nitrogen weight such as 27 or 30? That's for green grass. If you like to plant bulbs, you know that the bulb food contains some bone meal which is very high in phosphorus, the middle number. Here is a great way to remember what the numbers mean the next time you find yourself brain-frozen in the fertilizer aisle and forgot what Vic told you:

Up, down, and all around. The first number to help the plant grow up, the second to help the plant grow down, and the third, well you get the point. We'll talk about the best fertilizer of them all (Compost) in another posting. I'm done spreading the manure for today.

Monday, April 5, 2010

Easter weekend


Harvested the last of the winter crop this weekend. The carrots did well as did the Swiss Chard. I'm in the process of "hardening off" the seedlings. It's a two week process in which the plants are slowly exposed to the sun and outside elements.

I received my drip irrigation order in the mail and will post when the installation takes place.

In the garden, I've begun preparing the beds with the appropriate soil amendments, and cleaned and oiled the rat traps and BB gun, I mean, the Havahart LIVE animal cage. Don't get me wrong, I love squirrels, just not in my peach tree. Last year, I humanely relocated a total of 7 to the greener pastures of Central Park, to no avail. This year will be different I predict. More to follow on that subject.

On a side note, John passed his driver's test today and received his license. Motoring public be warned!


Saturday, April 3, 2010

Potting Up


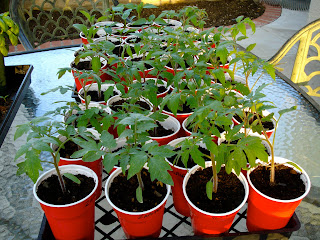
As I try to get us up to present day, we now move to March 27, when the seedlings were ready for transplant into the red cups. I added a small amount of diluted fish emulsion to give them a kick start the week prior to the transplant. As you can see, the roots are very long and healthy. Be sure to poke a few holes in the bottom of the cups for drainage.


Friday, April 2, 2010

Seedlings Emerge!


On March 3, 2010, the seedlings have begun to sprout. The tomatoes have appeared first, and the peppers and eggplant will soon follow. The two seeds in each cell have germinated and I cut the smaller of the two plants at the sponge level so I'm left with one plant per cell. It's best to cut the seedling rather than pull so as not to damage the roots of the remaining plant.

Once the seeds have germinated, it's time to lower the fluorescent light fixture to within 2" of the plants. I use 40 watt "full spectrum" tubes found at your local home center to give the seedlings the best artificial light. By March 18, 2010, the seedlings are starting to take shape.

Sowing the Seeds


I began this year's crop on February 27, 2010. In the past, I have always used peat pots found in the Jiffy starting kit, but decided to try the Park Seed Biodome system given to me by Grandpa Frank last summer. It's basically a styrofoam block filled with individual plugs of a sponge material which floats on water. This system is designed to train the roots straight down, and there is no worry of overwatering as the seedlings wick only what they need. Plus, since the roots do not weave into the styrofoam, the risk of damaging the plant is greatly reduced when it comes time to pot them up.

I drop 2 seeds per cell to improve the germination rate. With the lid on and the vents closed, I place the Biodome on a seed germination heating pad and wait for the miracle to happen. The heat pad speeds up the germination process by a few days, and the lid helps create a nice humid environment.


Intro

I’ve been growing tomatoes and peppers in the backyard garden for several years now and decided it was time jot down the trials and tribulations of the upcoming growing season for anyone interested in how the garden grows in Valencia, California.

From seed-starts to drip irrigation, and seedlings to harvest, I’ll do my best to get it all up for a few laughs and maybe a lesson or two learned along the way. As an added bonus, I’ll be sure to chronicle each and every skirmish as I go head-to-head with the rats, squirrels and other nefarious creatures who do their best to steal my sanity, along with the occasional heirloom tomato. It’s a battle my family and co-workers know all too well.

As grilling season heats up, I’ll post the latest pictures of whatever selection of beef, pork or chicken makes its way from grill to plate.

So here goes.